

High-quality videos require a planning stage where you figure out, organize, and optimize all the aspects you want to feature on the finished product. Whether it’s a movie, a YouTube show, or a branded video marketing piece, when we watch great video content, we’re looking at the result of a lengthy creative production process.
And one of the most critical tools professionals use to get there is the storyboard.
Storyboards are all about helping with the quick conceptualization of ideas, working as a sequence of illustrated scene references in the form of vignettes and organized to suit your video’s ultimate narrative.
However, getting the most out of this tool requires you to understand what it is (and isn’t) for, as it’s fairly easy to waste significant time and effort on something that’s merely there to help you avoid troubles and polish the finished piece.
So, how do you go about making a truly useful storyboard? Keep reading, and you’ll learn the ins and outs of creating one that helps you make a video like the pros!
Tools of the trade: The different types of storyboards
Broadly speaking, there are three types of storyboards you can use nowadays: hand-drawn storyboards, digital storyboards, and thumbnail storyboards.
The hand-drawn method is the traditional and oldest storyboard technique
With a pencil, a blank sheet, and a series of simple sketches, you can use it to build references based on your initial thoughts on how the video should flow—way before animating or filming any scene.
While traditionally significant, working this tool by hand presents more troubles than it solves, requiring a lot of time and effort to go back and tweak or change things. So, we’ll be mostly focusing on the digital way of doing things moving forward.
Digital storyboards have become the go-to in most types of productions, but especially for animated tutorial video projects
With this technique, you can use software to customize graphics and colors and make sure that all the scenes, characters, and notes are well-placed.
Most importantly, a digital setup makes it extremely easy to change and adapt your storyboard as you move forward during the pre-production stages of your video—which gives you a lot more flexibility to start polishing elements of your video even before you move on to production.
Finally, you have thumbnail storyboards
These are mostly used for simple projects given that they are quickly made and easy to compile since it doesn’t require so much text or detailed information, just a few draws to visualize core ideas in sequential order.
This type of storyboard is mostly meant to serve as a quick visual reference of your project’s flow and isn’t really there to provide a robust production tool.
Learning to make pro-level storyboards
Making a video is already a challenge in itself, but when you plan on creating one, storyboards become a key part of that planning process. By working on one, you can find new and interesting ways to structure your initial ideas into a sequence of scenes that make up a compelling final video.
But a good, useful storyboard requires more than just a few sketches in a sequence of squares! So let’s take a closer look at how professionals build a reliable storyboard.
First step: Define the general idea of the video
Before starting with your storyboard, you’ll first want to define the purpose of your video. It is not wise to start drawing scene ideas without having a clear notion of your aims and goals for this piece of content.
Planning an effective video requires serious preparation. For example, if you want to create a storyboard for a video to promote a product, the main purpose would be showcasing that product in visually compelling ways. If you are making an animated explainer video for a teamwork seminar, the core purpose would be to communicate your information in simple and entertaining ways.
Since storyboarding occurs during the planning stages before you start production, it’s important to establish what you want to accomplish with your video and why it will appeal to your viewers.
That is to say, you need to understand the type of video you’d like to make in order to approach the storyboarding process differently, building scenes that make sense for that type of video.
Once that’s taken care of, you can use that information as guidelines for your storyboard’s sketches. This will help you determine things like framing, camera angles, zoom, lighting, transitions, and other information you’d like to include as you start crafting the key scenes that will make up your storyboard.
Second step: List the major scenes you want to include in the video
Once you know what you are going for with your video, it is recommended to structure all the major scenes you’ll want to feature in a list. These will be the building blocks that will make up your storyboard (and, eventually, your video!)
Start with an entry for your opening scene, and then move on to adding every major scene after it until you reach your closing screen. Try to include a specific entry for each major scene or sequence in your video, and try to be as clear as possible in your quick descriptions so that it’s easy to follow later on when you are putting together and then editing your piece.
Once you have the full list of the major scenes you want in your video, start adding to the list all the major actions, characters, transitions, and additional information that you intend to use in your video. What characters are involved? What actions are they performing? Where? Why?
Make notes under each specific scene entry in your list. Be clear, but be brief. Remember, this is supposed to act as a guideline to build your storyboard, not a substitute for your script or director!
In addition to these details, you are going to make a note of all the technical aspects that are part of each scene creation. Things like shot composition, sound effects, equipment involved, lighting effects, and even camera movement references.
Now, you have a bunch of written ideas and scene instructions that provide a fairly clear idea of what your video will be. It’s time to start figuring out what that looks like!
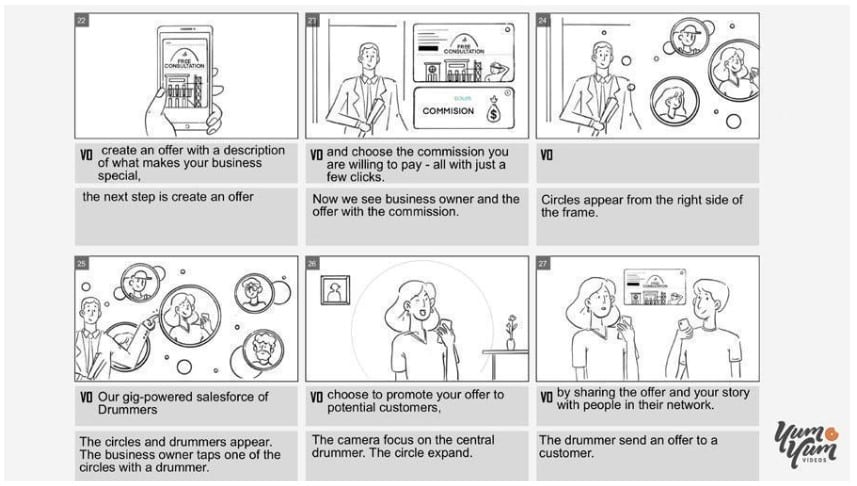
Check out the finished video and see how the sketches translate into the final piece:
Third step: Roll up your sleeves; it’s sketch time
Once you have listed the sequence of scenes you want, it’s time to start drawing the visual references that will comprise your storyboard. The whole goal here is to plan out the story visually, but only as a reference.
Start creating evocative images in a sequential order to organize your video’s narrative in the form of vignettes, following the list you already put together. Draw shapes that represent each of the characters and key events that will come into play in each of the scenes.
You don’t need to waste time trying to make every sketch visually stunning; only accurate enough to be as useful as possible once you move on to production.
You can use easy-to-read elements like ovals, lines, squares, triangles, thought clouds, and everything you need to achieve your goals and convey your ideas for each scene. You can also use AI drawing tools to help you visualize and refine your designs, or expand on the ideas you already have.
Take this step as a way to test your video’s expectations. Determine if the visual narrative you are building expresses the purpose you had in the first place. If it doesn’t, this is also the time to tweak, add, remove, and change scenes to start refining your video—where your storyboard gets to shine as a production tool!
This step is also useful to help optimize your resources. Is there something that doesn’t make much sense? Maybe you forgot a detail or made a mistake while drafting your scene list. Is there a scene that will require more gear or time to produce?
Sketching and changing your storyboard gives you the perfect opportunity to figure out those challenges and anticipate those needs.
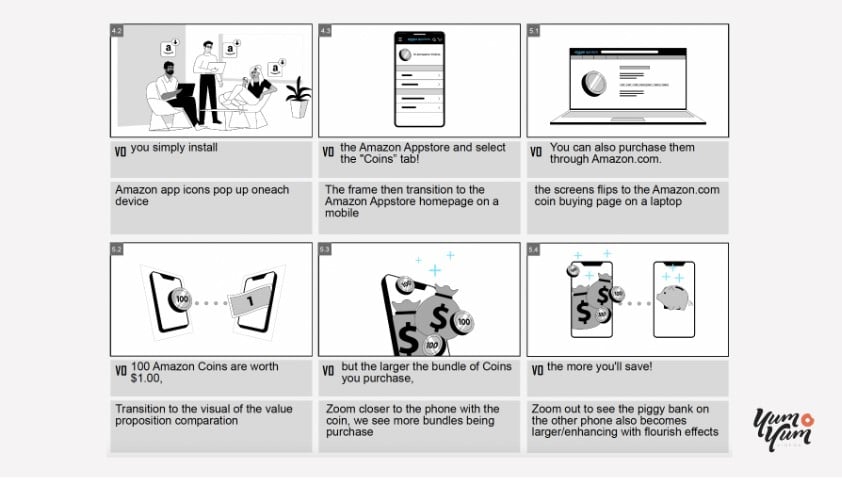
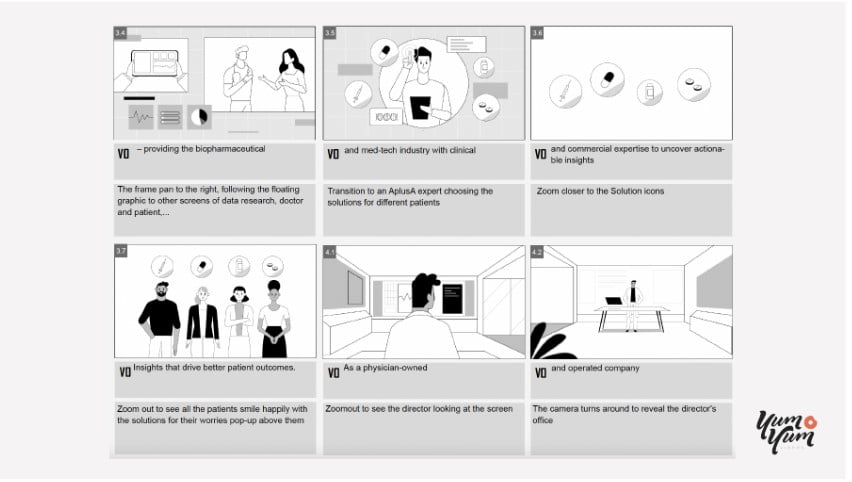
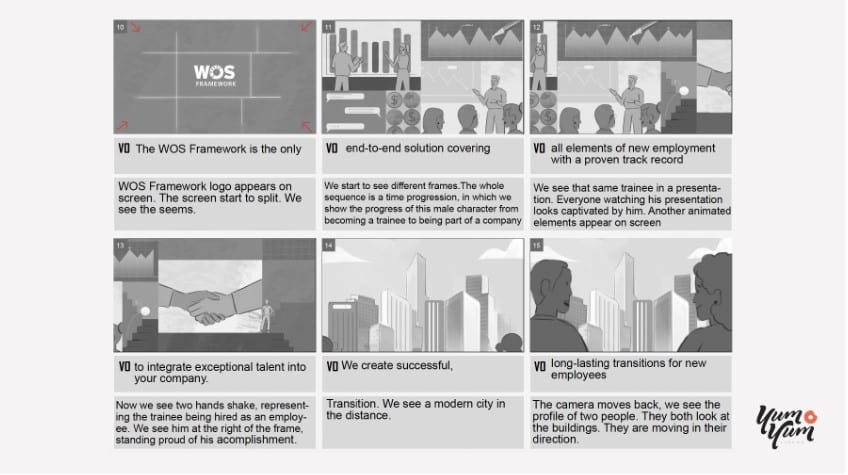
Check out the finished video and see how the sketches translate into the final piece:
Fourth step: Leverage context cues to make the most out of your storyboard
By now, your storyboard is nearly completed. You have identified all the major scenes, actions, and characters that play key roles in your video, along with the additional information and the illustrated representations.
But how can you ensure this tool will help you the most once you move into production?
Well, there are a few additional context elements you’ll want to add to your storyboard before you call it done. Design elements that will clarify your original intent and will make the whole tool more readable moving forward.
- First, implement directional arrows into your storyboard. They are typically used to indicate how the angle or a character is moving through a scene. Draw some of them to give the movement effect and help you clarify whatever camera movement notes you already have.
- Second, adding information about relevant elements and interactions between characters in each scene. Your sketch might depict two friends in a bar. Now, they might kiss, or they might fight. Since both of those scenes wouldn’t share the same atmosphere, you will want to add those types of details below the sketch. This way, it will be easier to differentiate the acts that take place in a scene beyond the scenario depicted in your storyboard sketches.
- Third, it’s also convenient to write brief descriptions and referential notes below each panel of the storyboard. Thus, you can express in a simple manner what you can’t show with your drawings. Maybe one of the characters has a high-pitched voice, or maybe there’s no dialogue at all and just a creepy background tune. Making notes on those elements should help you keep everything in order once you move on to production and even help you find opportunities to add things like branded elements or sequences that reinforce your video’s goals.
Besides all the information that you already illustrated, these final elements are all about helping you get your ideas across. They improve the quality of your storyboard by helping you quickly figure out how the shots will flow together throughout the entire piece, which will save you a lot of headaches once the cameras are rolling and the illustrators are drawing!
To sum things up
You don’t have to be a great design artist to create a good quality storyboard because the drawing doesn’t have to be so detailed.
The important thing is that it conveys what you want to show in your video, in a simple manner, by expressing the main points, like the sounds, narrative, and actions to accomplish the aim, that is: your video.
Be sure to keep it simple so everyone can understand the process behind your thinking and develop a storyboard exploring the different ways to start crafting your panels for visualizing your final concept to your customers!